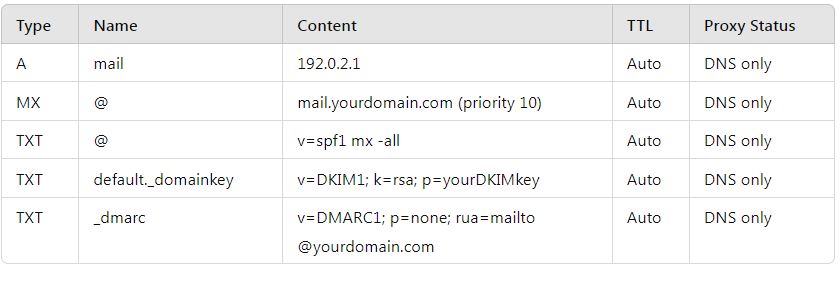
To configure Webmin for outgoing email, you will typically be setting up and configuring an SMTP server, often using Postfix. Here is a step-by-step guide to configure Webmin for outgoing email:
Step-by-Step Guide to Configure Webmin for Outgoing Email
1. Install Postfix
First, ensure that Postfix is installed on your server. You can install Postfix using the following command:
sudo apt-get install postfix
2. Access Webmin
Open your web browser and navigate to https://your-server-ip:10000. Log in with your Webmin credentials.
3. Configure Postfix in Webmin
- Navigate to Postfix Mail Server:
- Go to
Servers>Postfix Mail Server.
- Go to
- General Options:
- Click on
General Optionsto configure the general settings.- Mail name: Set this to your domain name (e.g.,
example.com). - Internet hostname of this mail system: Set this to the fully qualified domain name (FQDN) of your mail server (e.g.,
mail.example.com).
- Mail name: Set this to your domain name (e.g.,
- Click on
- SMTP Authentication And Encryption:
- Click on
SMTP Authentication And Encryption. - Enable
TLSfor SMTP communication to ensure encrypted email sending. - Set up any required authentication methods if your outgoing mail server requires authentication.
- Click on
- Outgoing Mail Configuration:
- Navigate to
SMTP Server Options. - Ensure that
Allow connections fromis set toAll. - Set
Relay Domainsto include any domains you will be sending emails to.
- Navigate to
- Editing the Postfix Configuration Files:
- Go to
Servers>Postfix Mail Server>Edit Config Files. - Select
main.cfand add or modify the following lines:myhostname = mail.example.com
mydomain = example.com
myorigin = /etc/mailname
relayhost = [smtp.your-isp.com]:587
smtp_use_tls = yes
smtp_tls_security_level = encrypt
smtp_tls_note_starttls_offer = yes
smtp_tls_CAfile = /etc/ssl/certs/ca-certificates.crt
smtp_sasl_auth_enable = yes
smtp_sasl_password_maps = hash:/etc/postfix/sasl_passwd
smtp_sasl_security_options = noanonymous - Note: Replace
[smtp.your-isp.com]:587with your actual outgoing SMTP server and port.
- Go to
- Set Up SASL Authentication:
- Create or edit the
/etc/postfix/sasl_passwdfile:sudo nano /etc/postfix/sasl_passwd
- Add the following line, replacing with your actual SMTP server details and credentials:
[smtp.your-isp.com]:587 username:password
- Add the following line, replacing with your actual SMTP server details and credentials:
- Save and close the file.
- Secure the
sasl_passwdfile:sudo chmod 600 /etc/postfix/sasl_passwd
- Convert the
sasl_passwdfile to a Postfix lookup table:sudo postmap /etc/postfix/sasl_passwd
- Create or edit the
4. Restart Postfix
Restart Postfix to apply the changes:
sudo systemctl restart postfix
5. Test Outgoing Email
Send a test email to ensure that everything is working correctly. You can use an email client or a command-line tool like mail:
echo "Test email body" | mail -s "Test Email" [email protected]
6. Check Mail Logs
Check the mail logs for any errors or issues:
tail -f /var/log/mail.log
Additional Configurations
- SPF, DKIM, and DMARC:
- Ensure you have SPF, DKIM, and DMARC records set up in your DNS to improve email deliverability and security.
- Configure SPF:
- Add a TXT record in your DNS settings:
v=spf1 a mx ip4:your_server_ip -all
- Add a TXT record in your DNS settings:
- Configure DKIM:
- Install DKIM:
sudo apt-get install opendkim opendkim-tools
- Configure DKIM in Postfix and your DNS records.
- Install DKIM:
- Configure DMARC:
- Add a TXT record in your DNS settings:
_dmarc.example.com. IN TXT "v=DMARC1; p=none; rua=mailto:[email protected]"
- Add a TXT record in your DNS settings:
By following these steps, you can configure Webmin for outgoing email using Postfix. If you encounter any issues, checking the mail logs can provide valuable insights into what might be going wrong. If you need further assistance, feel free to ask!


